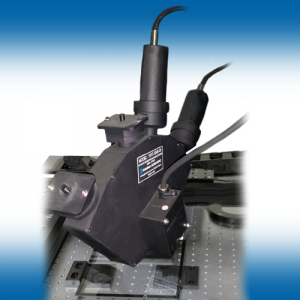
The 191F Reflectance Measurement Heads are available in fixed angle of incidence configurations ranging from 10 to 75º. A handheld unit with variable angle of incidence is also available, please contact us for further details. The models are capable of first surface or total specular reflection on glass, plastic, metal or polished substrates, and can be used with sample sizes as thin as 400µm. The spectral range is from 380 to 940nm.
Overview
Specifications
Overview
Highly Accurate & Repeatable Reflection Measurements
- Nondestructively capture complete spectral and colorimetric properties with scan times as short as 300ms per measurement point
- Isolated first-surface measurement of thin glass substrates down to 0.15mm in thickness without requiring second-surface masking
- Measure total reflectance or isolate internal optical interfaces
- Test capability for first surface and specular surfaces
- Configuration options including handheld, semi-automatic and fully automatic rotary systems with robotic loading
In addition to our exceptional technical and functional capabilities, Gamma Scientific is ISO/IEC 17025 accredited by NVLAP (NVLAP lab code 200823-0).
Specifications
| 191F Reflectance Measurement Systems | ||||
|---|---|---|---|---|
| 191 Optical Head | 191F-10 | 191F-20 | 191F-45 | 191F-75 |
| Measurement Type | First Surface or Total Specular Reflection | First Surface or Total Specular Reflection | First Surface or Total Specular Reflection | First Surface or Total Specular Reflection |
| Sample Types | Glass, Plastic, Metal, Polished Substrates | Glass, Plastic, Metal, Polished Substrates | Glass, Plastic, Metal, Polished Substrates | Glass, Plastic, Metal, Polished Substrates |
| Illumination Angle | 10° | 20° | 45° | 75° |
| Viewing Angle | 10° | 20° | 45° | 75° |
| Minimum Sample Thickness | 0.4mm (transparent samples) None (opaque samples) | 0.35mm (transparent samples) None (opaque samples) | 0.15mm (transparent samples) None (opaque samples) | 0.15mm (transparent samples) None (opaque samples) |
| Maximum Sample Thickness | None | None | None | None |
| Minimum Sample Size | 25mm diameter or 25 x 25mm square | 25mm diameter or 25 x 25mm square | 25mm diameter or 25 x 25mm square | 25mm diameter or 25 x 25mm square |
| Maximum Sample Size | None | None | None | None |
| Spectral Range | 380 to 940nm | 380 to 940nm | 380 to 940nm | 380 to 940nm |
| Illumination Spot Size (Area of Analysis) | 1mm x 10µm | 1mm x 10µm | 1mm x 10µm | 1mm x 10µm |
| Measurement Speed (Sample Dependent) | ≈300-3000ms | ≈300-3000ms | ≈300-3000ms | ≈300-3000ms |
| Calibration Reference Standard | 6″ (150mm) BK-7 Polished Glass | 6″ (150mm) BK-7 Polished Glass | 6″ (150mm) BK-7 Polished Glass | 6″ (150mm) BK-7 Polished Glass |
| Optical Head Dimensions | Height: 230mm (9″) Width: 150mm (6″) Depth: 150mm (6″) Weight: 1.6kg (3.5lbs) | Height: 230mm (9″) Width: 150mm (6″) Depth: 150mm (6″) Weight: 1.6kg (3.5lbs) | Height: 230mm (9″) Width: 150mm (6″) Depth: 150mm (6″) Weight: 1.6kg (3.5lbs) | Height: 230mm (9″) Width: 150mm (6″) Depth: 150mm (6″) Weight: 1.6kg (3.5lbs) |
| Accuracy | ||||
| Spectral Reflectance | ± 0.05% | ± 0.05% | ± 0.05% | ± 0.05% |
| Tristimulus (CIE 1931 X, Y, Z) | ± 0.05 | ± 0.05 | ± 0.05 | ± 0.05 |
| Chromaticity (CIE 1931 x,y) | ± 0.002 | ± 0.002 | ± 0.002 | ± 0.002 |
| LAB Color (CIE 1976 L*, a*, b*) | L ± 0.3, a* ± 0.2, b* ± 0.2 | L ± 0.3, a* ± 0.2, b* ± 0.2 | L ± 0.3, a* ± 0.2, b* ± 0.2 | L ± 0.3, a* ± 0.2, b* ± 0.2 |
| Average Reflectance | ± 0.1 | ± 0.1 | ± 0.1 | ± 0.1 |
| Reported Parameters | ||||
| Spectral Data | Reflectance as a function of wavelength | |||
| Colorimetric Data | CIE Tristimulus X, Y, Z, with 2° or 10° View Angle, (L*, a*, b*), (x, y), (u’, v’), and other parameters | |||
| Illuminant Weighting | Illuminant A, Illuminant B, Illuminant C, Illuminant D65, or User Specified Custom Illuminant | |||
2

